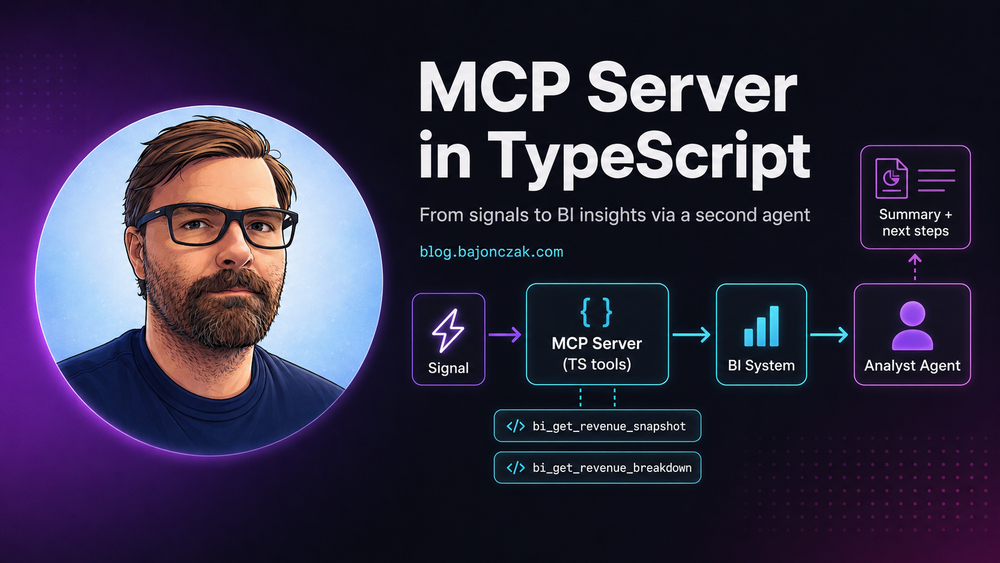
Building an MCP Server in TypeScript: Reacting to Signals, Querying BI, and Handing Off to a Second Agent
The useful MCP pattern is not "let the model access everything". It is the opposite: expose a few safe tools, return structured data, and keep the agent away from raw systems.
Most agent demos still start with a chat box. You ask something, the model answers. Fine.
But in enterprise systems, the valuable cases often start somewhere else: an alert fires, a KPI drops, a job fails, a ticket changes priority, a customer escalates.
That is where MCP becomes interesting.
Instead of giving an agent broad access to infrastructure, you expose a small set of tools with stable schemas. The agent can call those tools, but the dangerous parts stay in normal backend code: authentication, authorization, query limits, input validation, logging and data shaping.
In this example I use TypeScript to build a small MCP-style workflow:
- a revenue drop signal comes in
- the orchestrator asks an MCP server for safe BI numbers
- the MCP server queries a controlled BI backend
- a second analyst agent turns the numbers into a short summary and next steps
The important part is not the demo itself. The important part is the boundary.
The use case
Imagine a daily revenue KPI check.
One morning a monitoring rule fires:
Revenue today is down more than 12 percent vs. the 7-day average.
A useful automated response should answer a few basic questions:
- How large is the drop?
- Is it concentrated in a region, channel or product group?
- Is this a data issue, a business issue or still unclear?
- What should a human check next?
What I do not want is an agent with a generic SQL tool against the warehouse.
That is the difference between a useful automation and a future incident report.
Architecture
The shape is simple:
flowchart LR
    SIG[Signal event: revenue_drop] --> A1[Agent 1: Orchestrator]
    A1 --> MCP[MCP server: safe tools]
    MCP --> BI[BI system]
    A1 --> A2[Agent 2: Analyst]
    A2 --> OUT[Summary and next steps]
The roles are separated on purpose.
Agent 1 receives the signal and decides which tool calls are needed. The MCP server exposes controlled tools like bi_get_revenue_snapshot and bi_get_revenue_breakdown. Agent 2 only receives structured numbers and writes the narrative.
The analyst agent never touches the BI system directly.
That one design choice removes a lot of risk.
Start with boring contracts
First define the data structures. Keep them explicit and boring.
export type RevenueSignalEvent = {
  type: 'revenue_drop';
  tenantId: string;
  occurredAt: string;
  thresholdPct: number;
  metric: 'revenue';
  currency: 'EUR' | 'USD';
  scope: {
    date: string;
    compareDays: number;
  };
};

export type RevenueSnapshot = {
  date: string;
  currency: string;
  today: number;
  baselineAvg: number;
  deltaAbs: number;
  deltaPct: number;
};

export type BreakdownRow = {
  key: string;
  today: number;
  baselineAvg: number;
  deltaPct: number;
};

export type RevenueBreakdown = {
  dimension: 'region' | 'channel' | 'productGroup';
  rows: BreakdownRow[];
};
Notice what is missing: raw SQL, table names, dynamic filters, or a "query whatever you want" field.
That is deliberate.
MCP server shape in TypeScript
The exact SDK can change, but the pattern is always the same:
- define tool input schemas
- validate inputs server-side
- call trusted backend code
- return structured JSON
A compact version looks like this:
import { z } from 'zod';
import { createMcpServer, ToolContext } from './mcpRuntime';
import { biClient } from './biClient';

const RevenueSnapshotInput = z.object({
  date: z.string().regex(/^\d{4}-\d{2}-\d{2}$/),
  compareDays: z.number().int().min(1).max(30).default(7),
  currency: z.enum(['EUR', 'USD']).default('EUR'),
});

const RevenueBreakdownInput = z.object({
  date: z.string().regex(/^\d{4}-\d{2}-\d{2}$/),
  compareDays: z.number().int().min(1).max(30).default(7),
  dimension: z.enum(['region', 'channel', 'productGroup']),
  topN: z.number().int().min(3).max(50).default(10),
  currency: z.enum(['EUR', 'USD']).default('EUR'),
});

export function buildServer() {
  const server = createMcpServer({
    name: 'bi-insights-mcp',
    version: '1.0.0',
  });

  server.tool({
    name: 'bi_get_revenue_snapshot',
    description: 'Returns today vs baseline revenue snapshot for a date.',
    inputSchema: RevenueSnapshotInput,
    async handler(input: z.infer<typeof RevenueSnapshotInput>, ctx: ToolContext) {
      // Enforce tenant/user/role checks here before touching BI.
      return biClient.getRevenueSnapshot({
        tenantId: ctx.tenantId,
        ...input,
      });
    },
  });

  server.tool({
    name: 'bi_get_revenue_breakdown',
    description: 'Returns revenue breakdown by region, channel or product group.',
    inputSchema: RevenueBreakdownInput,
    async handler(input: z.infer<typeof RevenueBreakdownInput>, ctx: ToolContext) {
      return biClient.getRevenueBreakdown({
        tenantId: ctx.tenantId,
        ...input,
      });
    },
  });

  return server;
}
The schema is doing real work here. It limits dates, dimensions, result size and currency. The handler can also enforce tenant scoping and role checks before the BI client runs.
BI client: keep SQL behind the tool
For the BI layer, this could be Fabric Warehouse, a SQL endpoint, a Power BI dataset API or a custom internal service.
The rule stays the same: do not expose a generic query(sql) tool.
Keep the query in backend code and only allow safe parameters.
import sql from 'mssql';
import { RevenueSnapshot } from './contracts';

const pool = new sql.ConnectionPool({
  server: process.env.FABRIC_SQL_HOST!,
  database: process.env.FABRIC_SQL_DB!,
  user: process.env.FABRIC_SQL_USER!,
  password: process.env.FABRIC_SQL_PASSWORD!,
  options: { encrypt: true },
});

async function getPool() {
  if (!pool.connected) await pool.connect();
  return pool;
}

export const biClient = {
  async getRevenueSnapshot(opts: {
    tenantId: string;
    date: string;
    compareDays: number;
    currency: string;
  }): Promise<RevenueSnapshot> {
    const p = await getPool();
    const req = p.request();

    req.input('tenantId', sql.VarChar(64), opts.tenantId);
    req.input('date', sql.Date, opts.date);
    req.input('compareDays', sql.Int, opts.compareDays);
    req.input('currency', sql.VarChar(3), opts.currency);

    const result = await req.query(`
      WITH baseline AS (
        SELECT AVG(amount) AS baselineAvg
        FROM fact_revenue
        WHERE tenant_id = @tenantId
          AND currency = @currency
          AND [date] >= DATEADD(day, -@compareDays, @date)
          AND [date] < @date
      ),
      today AS (
        SELECT SUM(amount) AS today
        FROM fact_revenue
        WHERE tenant_id = @tenantId
          AND currency = @currency
          AND [date] = @date
      )
      SELECT today.today, baseline.baselineAvg
      FROM today CROSS JOIN baseline;
    `);

    const row = result.recordset[0];
    const today = Number(row.today ?? 0);
    const baselineAvg = Number(row.baselineAvg ?? 0);
    const deltaAbs = today - baselineAvg;
    const deltaPct = baselineAvg === 0 ? 0 : (deltaAbs / baselineAvg) * 100;

    return { date: opts.date, currency: opts.currency, today, baselineAvg, deltaAbs, deltaPct };
  },
};
This is not meant to be a full production BI client. The point is the shape: parameterized query, tenant scope, no raw SQL from the model.
Agent 1: react to the signal
The orchestrator can be an HTTP endpoint, Service Bus consumer, Event Grid handler or scheduled job.
Here is the HTTP version:
import express from 'express';
import { RevenueSignalEvent } from './contracts';
import { callMcpTool } from './mcpClient';
import { runAnalystAgent } from './secondAgent';

const app = express();
app.use(express.json());

app.post('/signals', async (req, res) => {
  const event = req.body as RevenueSignalEvent;

  if (event.type !== 'revenue_drop') {
    return res.status(400).json({ error: 'unsupported_event' });
  }

  const { date, compareDays } = event.scope;

  const snapshot = await callMcpTool('bi_get_revenue_snapshot', {
    date,
    compareDays,
    currency: event.currency,
  });

  const byRegion = await callMcpTool('bi_get_revenue_breakdown', {
    date,
    compareDays,
    dimension: 'region',
    topN: 10,
    currency: event.currency,
  });

  const byChannel = await callMcpTool('bi_get_revenue_breakdown', {
    date,
    compareDays,
    dimension: 'channel',
    topN: 10,
    currency: event.currency,
  });

  const analysis = await runAnalystAgent({
    event,
    snapshot,
    breakdowns: [byRegion, byChannel],
  });

  return res.json({ ok: true, analysis });
});

app.listen(3000);
In production, I would also add correlation IDs, idempotency, retries with limits, authentication on the webhook, and structured logging around every tool call.
Without logs, this kind of workflow becomes painful very quickly.
Agent 2: turn numbers into a useful summary
The second agent is safer because it only sees curated data.
It should explain the numbers and suggest checks, but it should not invent root causes.
import { RevenueSignalEvent, RevenueSnapshot, RevenueBreakdown } from './contracts';
import { llm } from './llmClient';

export async function runAnalystAgent(input: {
  event: RevenueSignalEvent;
  snapshot: RevenueSnapshot;
  breakdowns: RevenueBreakdown[];
}): Promise<{ summary: string; nextSteps: string[] }> {
  const prompt = `
You are an analyst agent.

Use only the numbers provided.
Do not invent causes.
Return a short summary and concrete next steps.

Event:
${JSON.stringify(input.event, null, 2)}

Snapshot:
${JSON.stringify(input.snapshot, null, 2)}

Breakdowns:
${JSON.stringify(input.breakdowns, null, 2)}
`;

  return llm.generateJson({
    schema: {
      type: 'object',
      properties: {
        summary: { type: 'string' },
        nextSteps: { type: 'array', items: { type: 'string' } },
      },
      required: ['summary', 'nextSteps'],
    },
    prompt,
  });
}
A good answer would be something like:
Revenue is down 14 percent vs. the 7-day baseline. The largest negative deltas are in Region West and Direct Sales. Check order intake, campaign end dates and whether the pricing feed changed overnight.
That is useful. It is also bounded.
What makes this enterprise-friendly
Three design choices matter most.
First: no raw query tools. The MCP server exposes safe metric tools with strict schemas.
Second: least privilege. The BI credentials should be read-only and scoped to the required dataset or tenant.
Third: separation of responsibilities. The analyst agent does not access BI directly. It only sees the numbers the MCP tool returned.
This is the same pattern I like for SAP, Microsoft 365, Entra or service desk scenarios. MCP tools should be a narrow capability surface, not a tunnel into every backend system.
My take
Building an MCP server is not interesting because it is new. It is interesting because it forces discipline.
You define the tools. You define the schemas. You decide which backend actions are allowed. You log the calls. You keep the model away from the raw system.
That is the part many agent demos skip.
If I were building this for a real tenant, I would start small: one signal, two BI tools, one analyst output, clear logs. Then I would add more signals only after the boundaries are proven.
The goal is not AI magic. The goal is controlled automation that can reason over the data you intentionally expose, without turning your BI system into a free-form prompt endpoint.