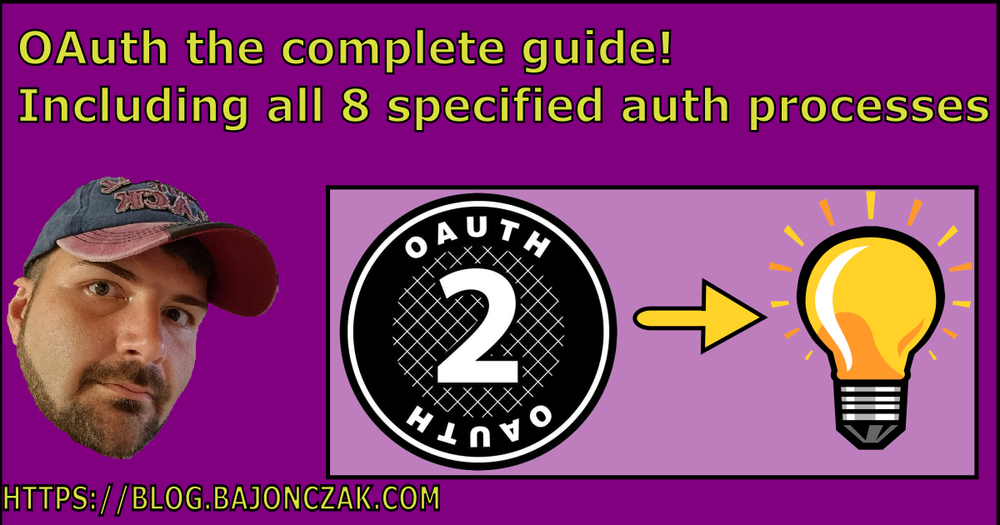
OAuth the complete guide! Including all 8 specified auth processes
This article contains a full description of OAuth and its Authentication and Authorization. In my project, I learned that some people don't understand OAuth Authentication, especially the Authentication Flows.
This article will describe the complete OAuth procedure and the different flows, the meaning of a token, the different token types, and how to handle special scenarios. I cover all scenarios that exist "in the wild."
So please leave a comment if anything is unclear, and I will describe it to improve the article.
What is OAuth?
For those who do not know OAuth, here is a small summary of OAuth
OAuth (Open Authorization) is an open standard for token,based authentication and authorization on the Internet. It allows third-party services to exchange and use information without exposing user credentials. OAuth is widely used in scenarios where users want to grant websites or applications access to their information without sharing passwords.
So, in fact, it's, in general, an exchange for accessing other Systems without leaking the user's login. You will know this as "Login with Google" or s.th. This is a simple OAuth flow that will propagate your user details (no security details) to third-party applications. So that it can create an internal user, with, for example, your name and email address. In each Login "Flow" it will create some Tokens.
Explaining the Tokens
There are three types of tokens
- Access token
- Refresh token
- Id token
Token structure in OAuth
It's important to understand that these tokens are always JSON objects. Every token structure contains three parts
- Header
- Body
- Signature
Header
The header defines the token type
The header typically consists of two parts:
- Type of Token
- Signing Algorithm
This will tell how the token was signed (For example, SHA256, RSA, or HMAC)
The header can look like this
{
  "alg": "RS256",
  "typ": "JWT"
}
Header example for a Token
Payload
The payload contains the claims. Claims are statements / Properties about an entity (typically, the user) and additional metadata. There are some default claims, like issuer, but you are free to add more claims for the target application.
There are three types of claims:
- Registered Claims: Predefined claims which are optional but recommended, such as
iss(issuer),iat(issued at the time),exp(expiration time),nbf(not before time),sub(subject), andaud(audience). - Public Claims: Custom claims that can be defined by those using JWTs.
- Private Claims: Custom claims agreed upon between two parties that use the JWT.
Example Payload (Base64-encoded JSON):
{
  "sub": "1234567890",
  "name": "John Doe",
  "admin": true,
  "iat": 1516239022
}
Signature
To create the signature part, you must take the encoded header, the encoded payload, a secret, and the algorithm specified in the header and sign that. For example, if you want to use the HMAC SHA256 algorithm, the signature will be created in the following way:
HMACSHA256(
base64UrlEncode(header) + "." +
base64UrlEncode(payload),
secret)
The result looks like this
SflKxwRJSMeKKF2QT4fwpMeJf36POk6yJV_adQssw5cThese parts will not be delivered separately, instead the base64 encoded parts will be concatenated together and will be separated by a dot '.'. This representation is called JWT-Token Format. A result can look like this:
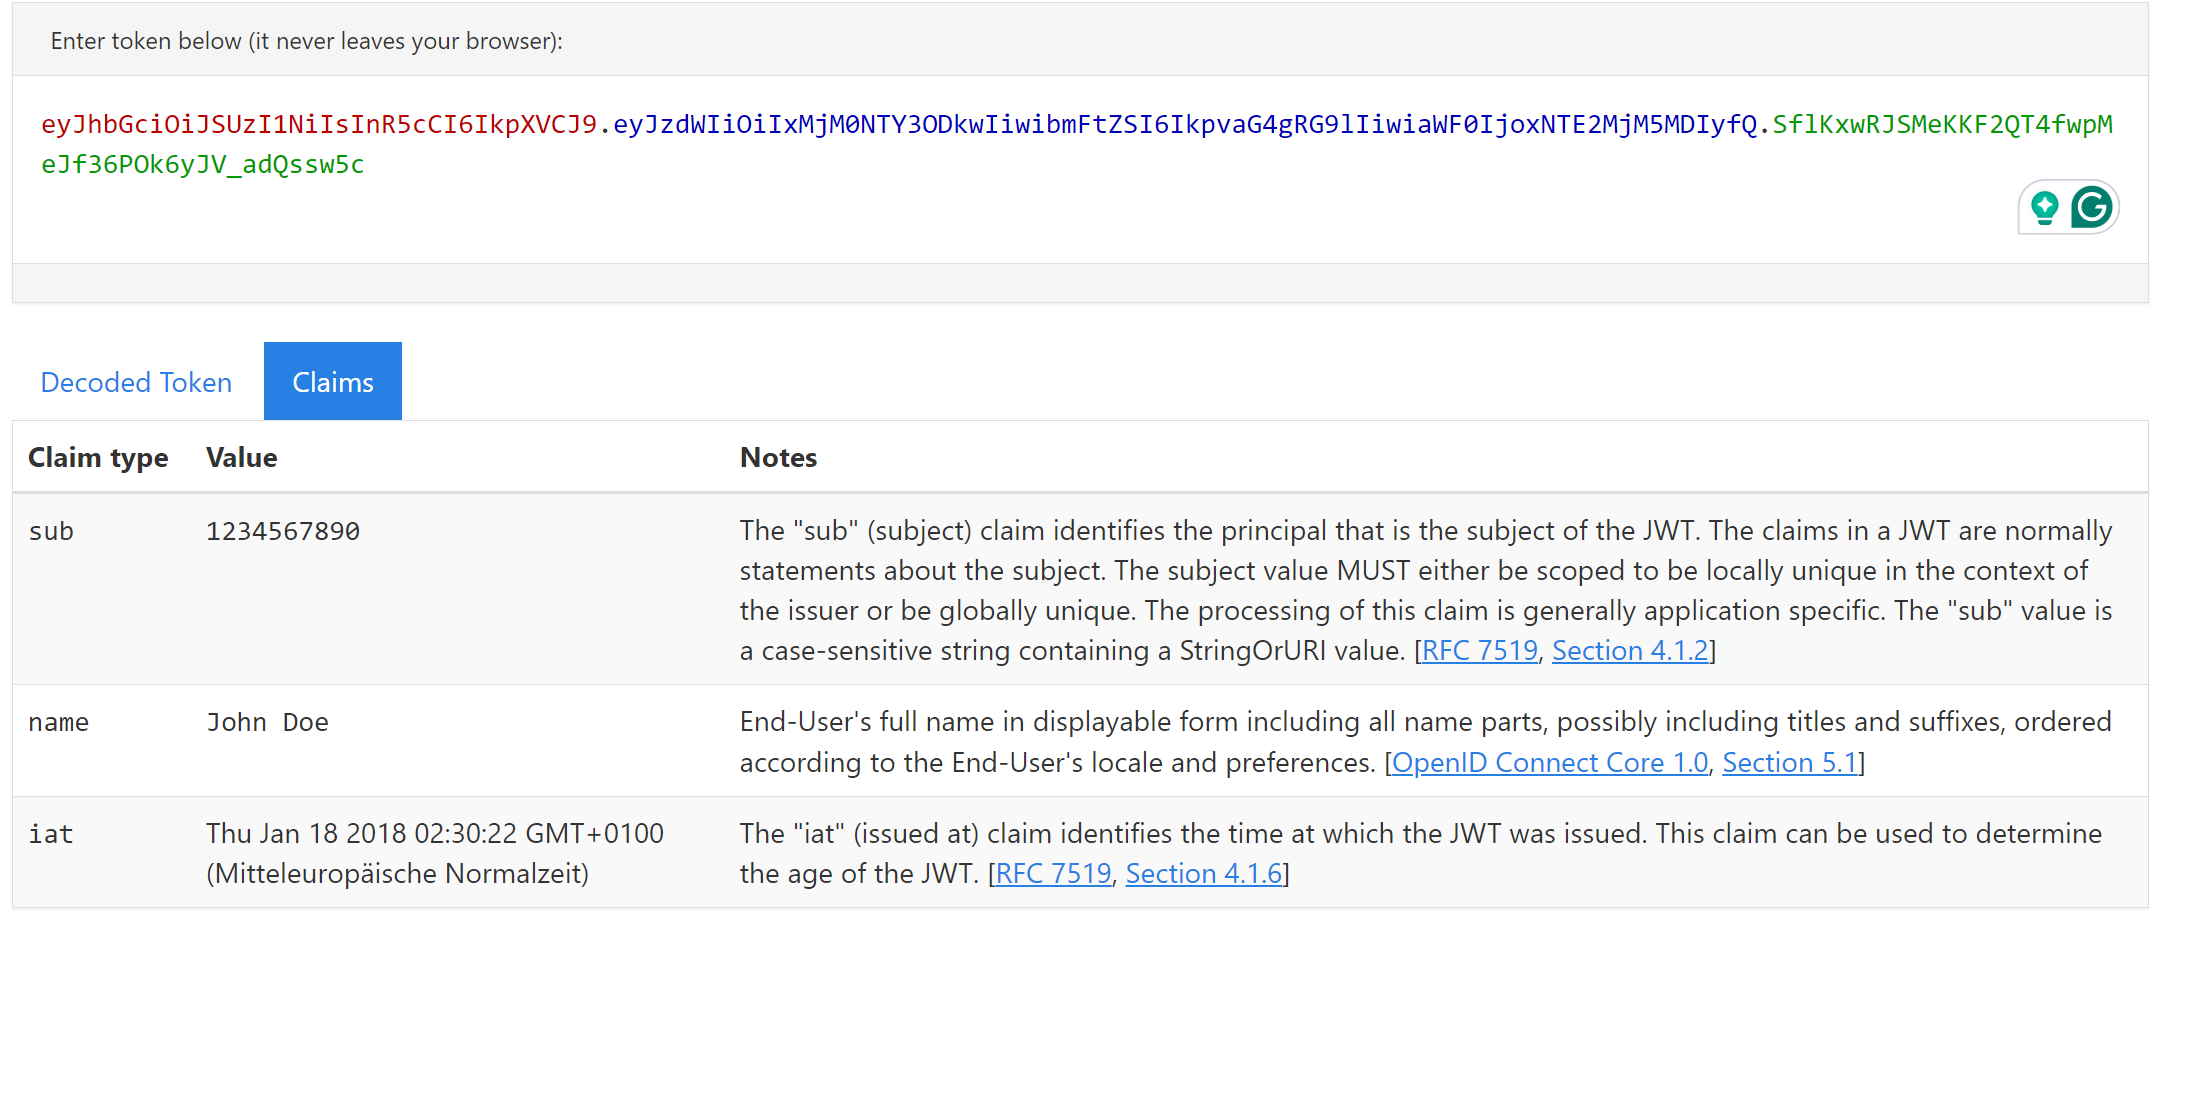
eyJhbGciOiJSUzI1NiIsInR5cCI6IkpXVCJ9.eyJzdWIiOiIxMjM0NTY3ODkwIiwibmFtZSI6IkpvaG4gRG9lIiwiaWF0IjoxNTE2MjM5MDIyfQ.SflKxwRJSMeKKF2QT4fwpMeJf36POk6yJV_adQssw5c
PROTIP: NAvigate to https://jwt.ms and you can paste your value onto this site
This will not only decode the Base64 encoded strings, but it will also display and describe the known claims; for example, I used the token above, and the result will look
So now you know about the anatomy of the OAuth Token. Let's talk about the different types.
ID token
This token will be presented as JWT-Token Format. For example
eyJhbGciOiJSUzI1NiIsImtpZCI6IjE2In0.eyJpc3MiOiJodHRwczovL2F1dGguanNlYy5jb20vIiwibmFtZSI6IkpvaG4gRG9lIiwiaWF0IjoxNTE2MjM5MDIyfQ.SflKxwRJSMeKKF2QT4fwpMeJf36POk6yJV_adQssw5c
The decoded value looks like this
{
  "alg": "RS256",
  "kid": "16"
}.{
  "iss": "https://auth.jsec.com/",
  "name": "John Doe",
  "iat": 1516239022
}.[Signature]
This tokens purpose is to provide information about the current user. So This will be used to provide some userdate from the Identity Provider, in wich the user is created.
Access token
This token will used to get access to protected resources. It will be provided as JWT-Token. An example Token can look like this:
eyJhbGciOiJSUzI1NiIsInR5cCI6IkpXVCJ9.eyJzdWIiOiIxMjM0NTY3ODkwIiwibmFtZSI6IkpvaG4gRG9lIiwiaWF0IjoxNTE2MjM5MDIyfQ.SflKxwRJSMeKKF2QT4fwpMeJf36POk6yJV_adQssw5cThe decoded value:
{
  "alg": "RS256",
  "typ": "JWT"
}.{
  "sub": "1234567890",
  "name": "John Doe",
  "iat": 1516239022
}.[Signature]
This will be used to get access to any resources. It looks similar to the ID token. But this token contains the claim sub this will identify the subject of the access token.
Refresh token
The Access token is only valid for a small amount of time (for example 2 Hours). So there is a possible way to get a new token for the current logged-in User, to avoid "relogin" the user. For that, the Refresh token will come into place.
This type of token will also represented as JWT-Format. It must contain the following claims
| Claim | Description |
|---|---|
| Token Identifier (jti) | A unique identifier for the refresh token. This helps in tracking the token and identifying it during validation. |
| Issuer (iss) | Identifies the principal that issued the JWT. It’s a string or URI that identifies the entity issuing the token. |
| Subject (sub) | Identifies the principal that is the subject of the JWT. Usually, this is the user ID. |
| Audience (aud) | Identifies the recipients that the JWT is intended for. It’s typically the client ID of the application that the token is issued to. |
| Issued At (iat) | The time at which the token was issued. This helps in determining the age of the token. |
| Expiration (exp) | The expiration time after which the token is no longer valid. This ensures the token has a limited lifespan for security reasons. |
For example, you will get the following token
{
  "jti": "unique-token-id-12345",
  "iss": "https://your-auth-server.com",
  "sub": "user-id-789",
  "aud": "your-client-id-001",
  "iat": 1593740000,
  "exp": 1600000000
}
So basically, the token is especially for the User 'user-id-789', which requires a new access token. It will only generated by the issuer 'https://your-auth-server.com', and it will generate only an access token for the application 'your-client-id-001'
Note: The expire time is way longer as the expiriation of an access token.
App Token vs User Token
Please be aware that there are two primary Tokens available. The App-Token (issued by services for the server-to-server communications) and the User-Token (issued by the user itself. No other systems are involved).
There are some need-to-know differences in these tokens
Authorization Context
The purpose of the authorization context for user Token is to authorize access on behalf of a specific user (or the current user)
On the other side, the app Token authorizes the application only to access resources.
So you can control if only users have access or only application or both. This will be done within the authorization server.
Lifetime
The token lifetimes are different. Where the user token has a shorter lifetime and needs to be refreshed very often, the app Token has a longer lifetime because it's normally in a controlled environment (server without public access)
Use Cases
Also, the use cases are very different, and this is very important to know. Because I figured out that some developers try to work only with app tokens instead of user tokens (because it's simpler to get access everywhere). That's not the idea behind the different token types. So here is the rule of thumb:
- Use a user token when you need to involve user data or actions taken on behalf of a user
- Use an app token when you act as a service, and do not use any user data during the entire process.
Follow these rules, and you are on the secure side of the developer life.
Obtaining a Token
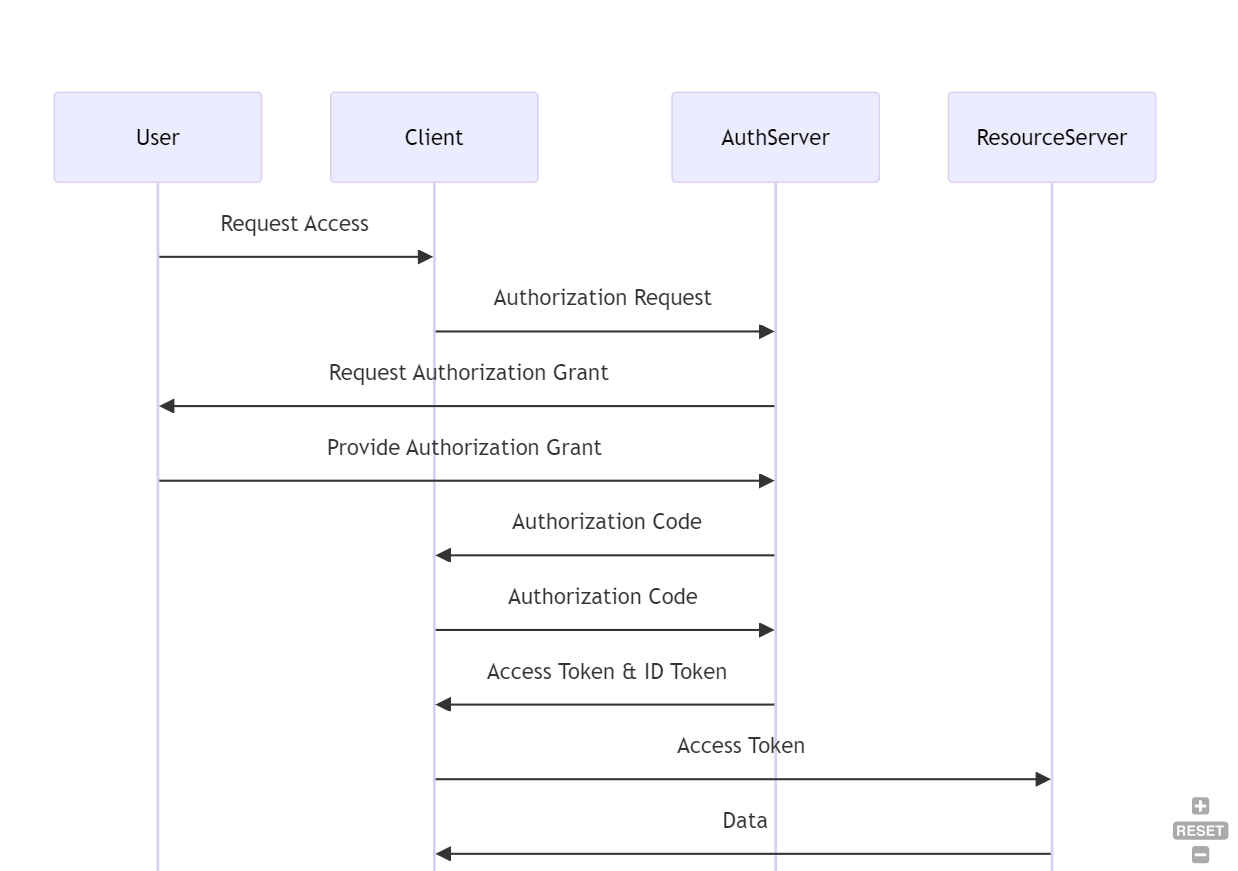
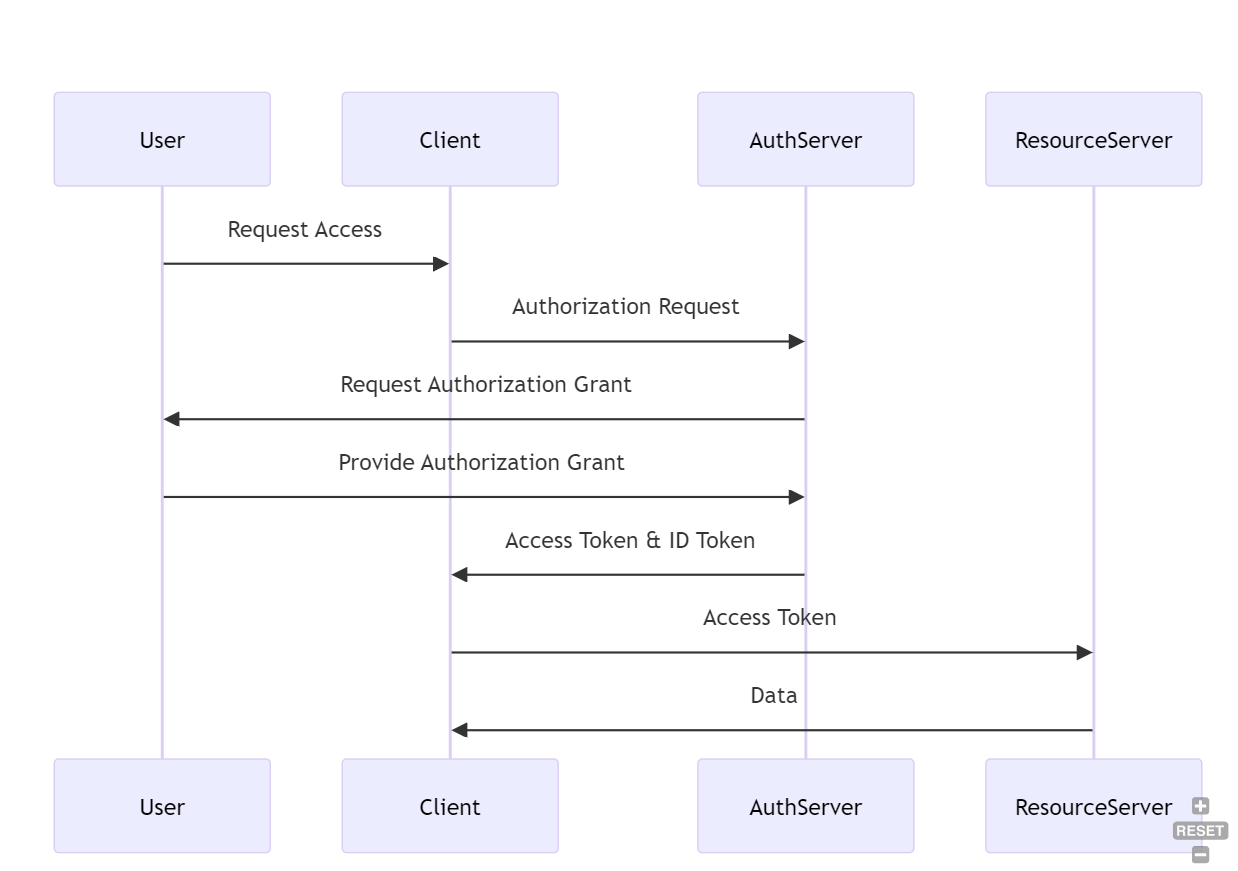
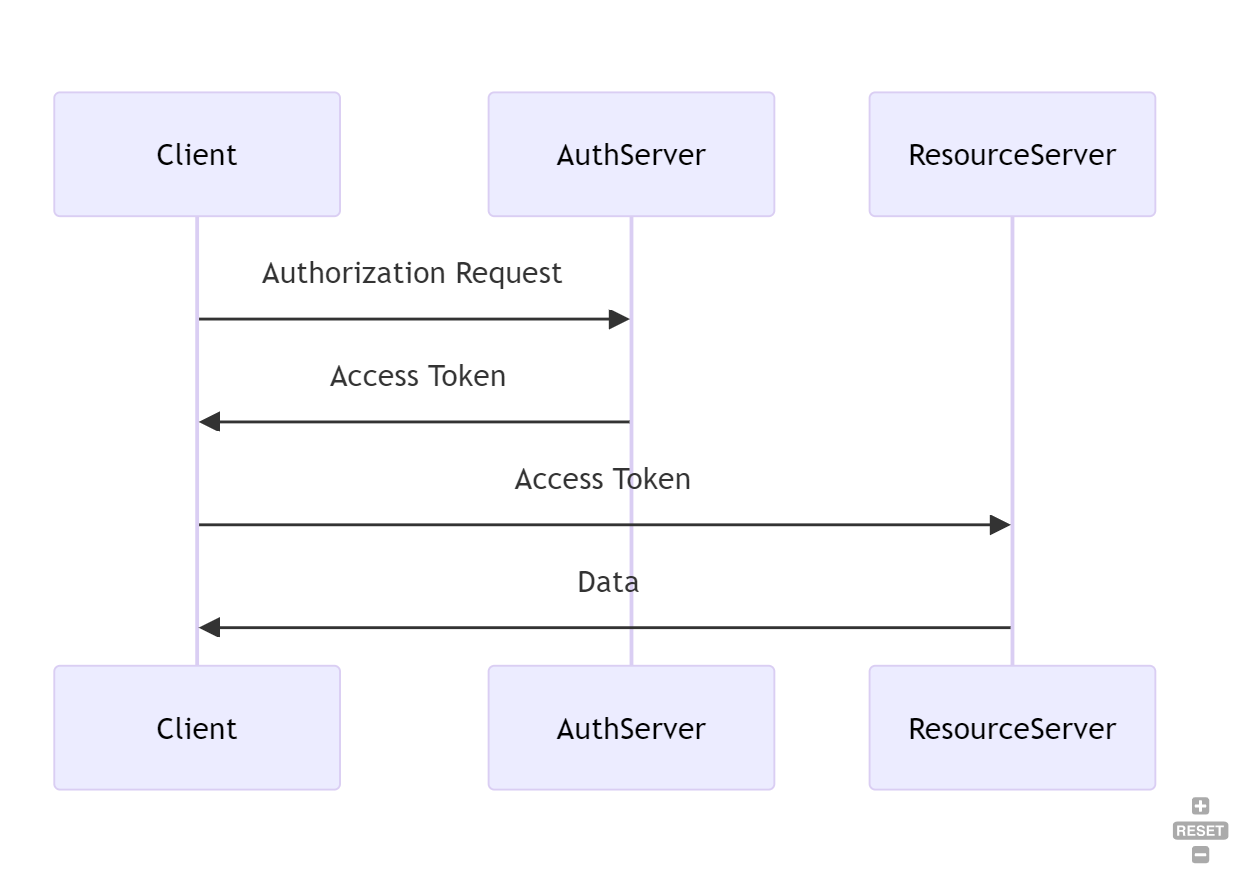
So, we have three types of tokens, but we must not generate three separate requests to get them. In general, we have the following Sequence diagram,
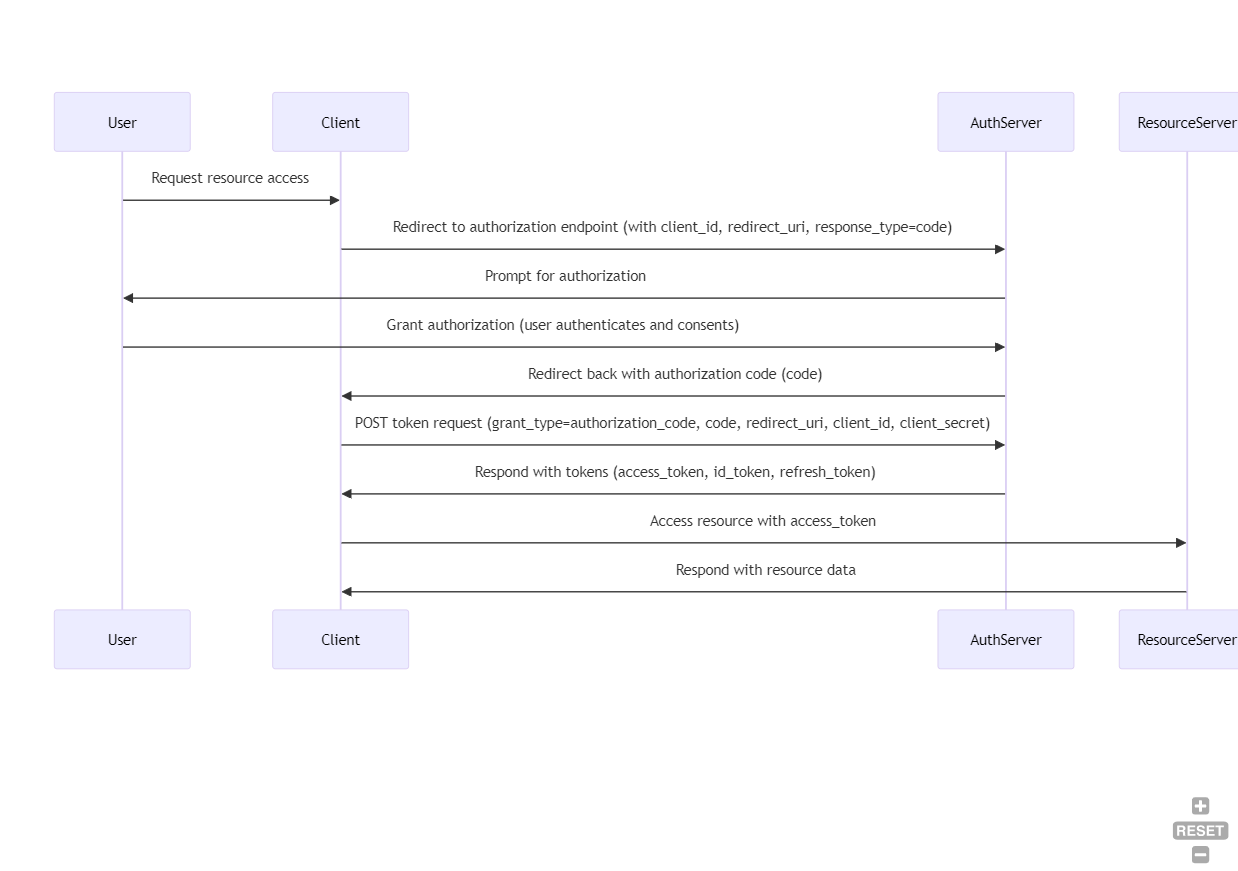
The steps are very easy:
- The user requests access to a resource via the client application.
- The client redirects the user to the authorization server's authorization endpoint.
- The user authenticates and authorizes the client.
- The authorization server redirects the user back to the client with an authorization code.
- The client sends a POST request to the authorization server's token endpoint, exchanging the authorization code for tokens.
- The authorization server responds with the access token, ID token, and refresh token.
- The client accesses the resource server using the access token.
- The resource server responds with the requested resource data.
The first request call is a POST call to your auth server (for example: authorization-server.com). This will start the OAuth Flow (more about this later).
POST /oauth2/token HTTP/1.1
Host: authorization-server.com
Content-Type: application/x-www-form-urlencoded

grant_type=authorization_code&code=authorization_code_value&redirect_uri=https%3A%2F%2Fclient-app.com%2Fcallback&client_id=your_client_id&client_secret=your_client_secret
You see, there are some parameters. Here is the list of parameters and it's description
| Parameter | Description |
|---|---|
| grant_type | Indicates that the grant type is an authorization code. |
| code | The authorization code received from the authorization server. |
| redirect_uri | The redirect URI registered with the authorization server. |
| client_id | The client ID issued to the client during the registration process. |
| client_secret | The client secret issued to the client during the registration process. |
IMPORTANT! You will only get an token send to the server that you tell within the requrect_uri parameter. You will never get a token back within this call
The expected response for this token request is like this
{
  "access_token": "access_token_value",
  "id_token": "id_token_value",
  "refresh_token": "refresh_token_value",
  "expires_in": 3600,
  "token_type": "Bearer"
}
So, the request will contain all the required tokens. That's now the basic understanding of OAuth.
More about the OAuth Flows
Actually, we describe the OAuth process for a Webapplication. But there are plenty of scenarios. For these, OAuth has its own process called OAuth Flow.
The following Flows are possible:
| Name | Scenario |
|---|---|
| Authorization Code Grant | Used for mobile applications |
| Implicit Grant | Will be used for webapplication (especcially single page applications) |
| Resource Owner Password Credentials Grant | Will be required in trusted applications where the user directly shares their credentials. |
| Client Credentials Grant | Will be used for machine to machine authentication (service to service) |
Let's do a deeper dive!
Basic requirements
For each request, there are mandatory parameters. These are the following.
| Parameter | Description |
|---|---|
| client_id | This is the client Id from the application. Sometimes it will be called application ID or app id |
| state | A value that is used to maintain the state between the request and callback, usually to prevent CSRF attacks. |
| redirect_uri | The target where the token will be send |
Authorization Code Grant
This flow will be used when developing authentication for mobile applications (Apps).
Here is the complete process for the flow
- User Authentication and Authorization
The User initiates the process by requesting access to a resource. The Client will redirect the user to the authorization server auth endpoint. Next, the user authenticates (logs in) and grants permission to the client application (consent)
This request is an example request to initiate the authentication process:
GET /oauth2/authorize HTTP/1.1
Host: authorization-server.com
Content-Type: application/x-www-form-urlencoded

response_type=code&client_id=your_client_id&redirect_uri=https%3A%2F%2Fclient-app.com%2Fcallback&scope=openid%20profile%20email&state=xyz123
Let me explain the HTTP parameters.
| Parameter | Description |
|---|---|
| response_type | Indicates that the client is requesting an authorization code. |
| client_id | The client ID issued to the client during registration. |
| redirect_uri | The redirect URI to which the authorization server will send the user after authorization. |
| scope | The scopes of access requested. |
| state | A value used to maintain state between the request and callback, usually to prevent CSRF attacks. |
- Sending back the authorization code
The response type is set to code. So it will respond with an authorization code (for example, "myauthcode". It will be sent through the location given in the redirect_url parameter. The call to this endpoint looks like the following.
HTTP/1.1 302 Found
Location: https://client-app.com/callback?code=myauthcode&state=xyz123
| Parameter | Description |
|---|---|
| grant_type | Indicates that the client is using the authorization code grant type |
| code | The generated authcode. |
| state | The same state value, that will be given in the request call. |
- Exchange authorization code for the token
After you get the code, you will be able to exchange this code with a valid token for the user by making the following request.
POST /oauth2/token HTTP/1.1
Host: authorization-server.com
Content-Type: application/x-www-form-urlencoded

grant_type=authorization_code&code=authorization_code_value&redirect_uri=https%3A%2F%2Fclient-app.com%2Fcallback&client_id=your_client_id&client_secret=your_client_secret
Let's explain the parameters.
| Parameter | Description |
|---|---|
| grant_type | Indicates that the client is using the authorization code grant type. |
| code | The authorization code received from the authorization server. |
| redirect_uri | The same redirect URI used in the initial authorization request. |
| client_id | The client ID issued to the client during registration. |
| client_secret | The client secret issued to the client during registration. |
So when you send the POST request, you will get the right tokens back through the target in the redirect_uri. This response will look like you already know.
{
  "access_token": "access_token_value",
  "id_token": "id_token_value",
  "refresh_token": "refresh_token_value",
  "expires_in": 3600,
  "token_type": "Bearer"
}
Implicit Grant
This is a default flow that will be used for single-page applications. This flow is the default flow that every web developer should use and know. So, let's look at this process.
This Flow contains of the following general steps
User Authentication and Authorization:
The user initiates the process by requesting access to a protected resource on the client application. After that, the client application redirects the user to the authorization server's authorization endpoint. Finally the user authenticates (logs in) and grants permission to the client application.
Take this as an example request.
GET /oauth2/authorize HTTP/1.1
Host: authorization-server.com
Content-Type: application/x-www-form-urlencoded

response_type=token&client_id=your_client_id&redirect_uri=https%3A%2F%2Fclient-app.com%2Fcallback&scope=openid%20profile%20email&state=xyz123
The parameters are similar to the parameters above. Let's explain again.
| Parameter | Description |
|---|---|
| response_type | Indicates that you request an access token |
| client_id | The client app id |
| redirect_uri | The redirect URI to which the authorization server will send the user after authorization. |
| scope | The scopes to request authorisation |
| state | A value used to maintain state between the request and callback, usually to prevent CSRF attacks. |
Token Issuance:
The authorization server redirects the user back to the client application with the access token (and optionally the ID token) in the URL fragment.
HTTP/1.1 302 Found
Location: https://client-app.com/callback#access_token=access_token_value&token_type=Bearer&expires_in=3600&state=xyz123
Access Protected Resources:
Now, the client application extracts the required access token from the URL fragment and requests protected resources from the resource server. It will then set the Authrozie header to the given access token prefixed with "Bearer".
GET /resource HTTP/1.1
Host: resource-server.com
Authorization: Bearer access_token_value
Resource Owner Password Credentials Grant
The Resource Owner Password Credentials Grant (ROPC) flow is designed for very highly trusted applications and involves the user providing their credentials (username and password) directly to the client application.
Attention! This flow is less secure than other OAuth 2.0 flows and is generally not recommended unless absolutely necessary.
However, the process of this flow is as follows.
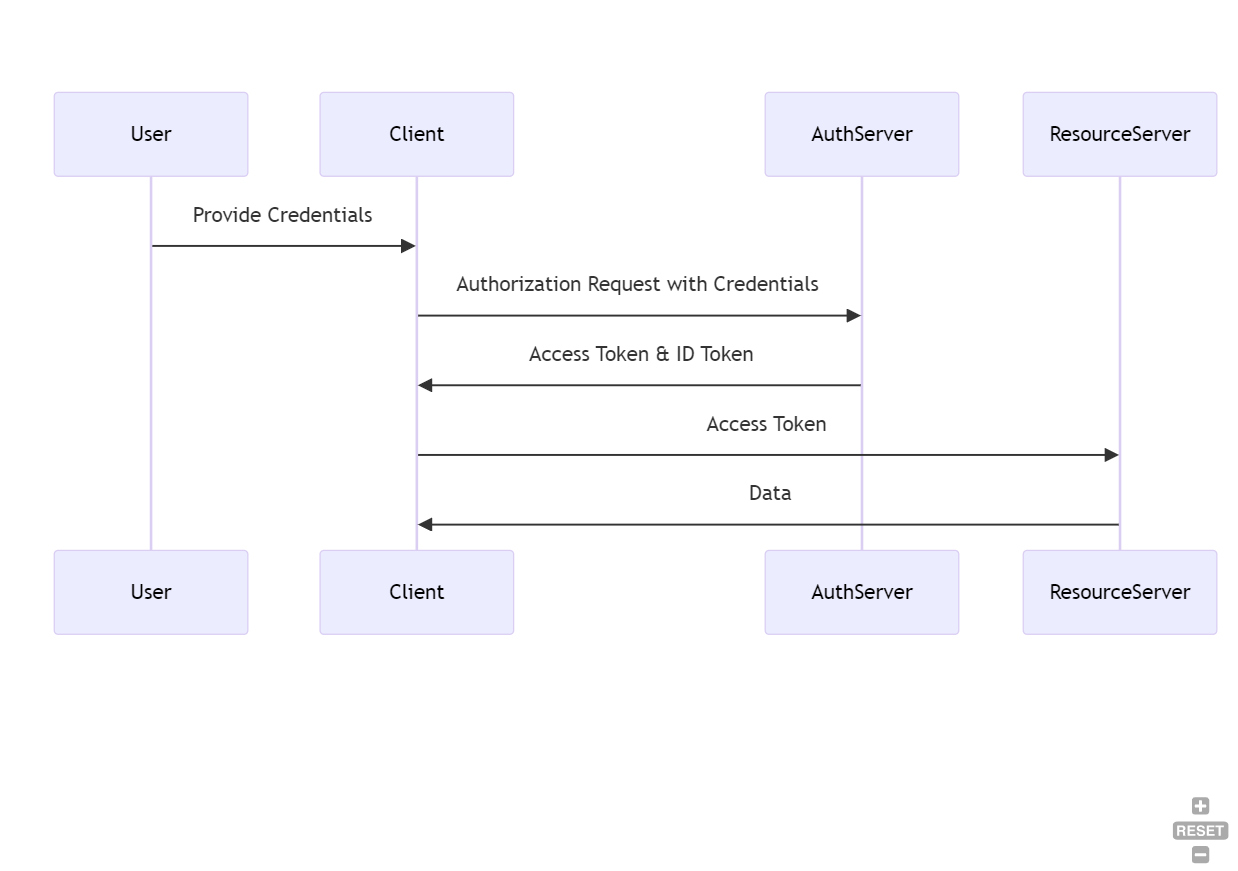
User Provides Credentials:
The user provides their username and password directly to the client application.
Token Request:
The client application sends a POST request to the authorization server's token endpoint, including the user's credentials.
POST /oauth2/token HTTP/1.1
Host: authorization-server.com
Content-Type: application/x-www-form-urlencoded

grant_type=password&username=user123&password=pass123&client_id=your_client_id&client_secret=your_client_secret&scope=openid%20profile%20email
Parameter explanation
| Parameter | Description |
|---|---|
| grant_type | Indicates that the client is using the Resource Owner Password Credentials grant type. |
| username | The username provided by the user. |
| password | The password provided by the user. |
| client_id | The client ID issued to the client during registration. |
| client_secret | The client secret issued to the client during registration. |
| scope | The scopes of access requested. |
Token Issuance:
The authorization server validates the credentials and, if valid, responds with an access token (and optionally a refresh token).
Here is an example of the result:
{
  "access_token": "access_token_value",
  "refresh_token": "refresh_token_value",
  "expires_in": 3600,
  "token_type": "Bearer"
}
Access Protected Resources:
The client application can now use the value in access_token to access protected resources.
GET /resource HTTP/1.1
Host: resource-server.com
Authorization: Bearer access_token_value
Again! You should use another flow for authenticating. Some idenety Providers prevents these flow for reasons.
Client Credentials Grant
The Client Credentials Grant is designed for machine-to-machine (M2M) applications where no user is involved. Use this flow when a client application must authenticate directly with the identity provider using its credentials to access resources or APIs.
To use this flow, you must create a secret within your application definition in the identity provider. The complete authentication flow looks like this.
Token Request
First of all the client application sends a POST request to the authorization server's token endpoint, including its client ID and client secret. Like this:
POST /oauth2/token HTTP/1.1
Host: authorization-server.com
Content-Type: application/x-www-form-urlencoded

grant_type=client_credentials&client_id=your_client_id&client_secret=your_client_secret&scope=api.read%20api.write
The most parameters are known
| Parameter | Description |
|---|---|
| grant_type | Indicates that the client is using the Client Credentials grant type. |
| client_id | The client ID issued to the client during registration. |
| client_secret | The client secret issued to the client during registration. |
| scope | The scopes of access requested. |
Token Issuance (Authorize and sends token back)
The authorization server validates the client's credentials and, if valid, responds with an access token.
This is a large difference to the other flows, because the token will be send back directly. But this token is not an token for a specific user, it's only for the application itself.
Access Protected Resources
Finally you can now use the access token for requesting the protected sources
GET /resource HTTP/1.1
Host: resource-server.com
Authorization: Bearer access_token_value
On-Behalf-Of (OBO) Flow
This process will be used when a Service A will call Service B on behalf of the current user. For this, the user is already authenticated and fetched already an access token that Service A can use to obtain an token for Service B. For the visual guys, here is the Process.
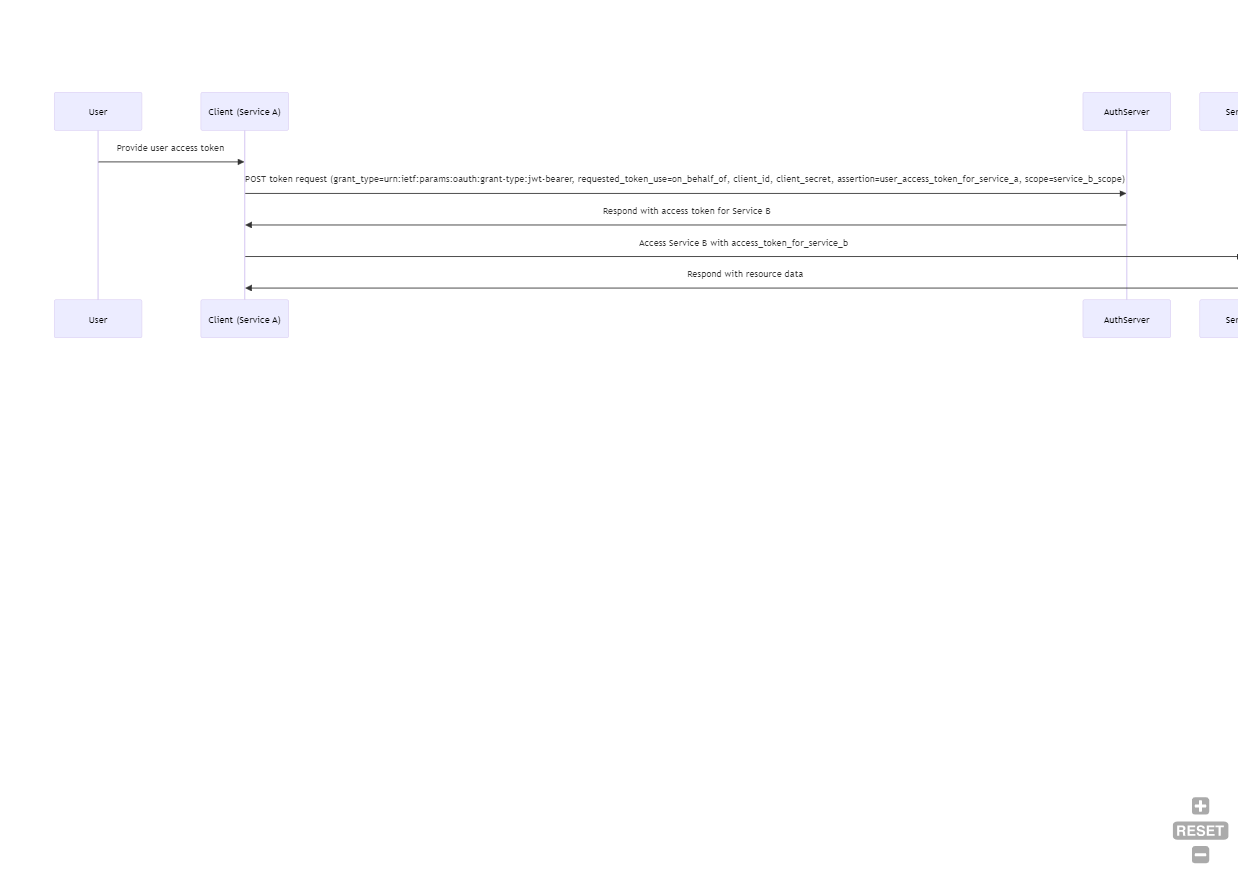
The steps are the following.
User Authenticates and Obtains Access Token for Service A:
The user authenticates with the authorization server and obtains an access token for Service A. This is done by an implicit auth flow. So the user has already a token like this
{
  "access_token": "user_access_token_for_service_a",
  "expires_in": 3600,
  "token_type": "Bearer"
}
Service A Requests an Access Token for Service B:
Next, the service A sends a POST request to the authorization server's token endpoint, providing the user's access token and its own client credentials to obtain an access token for Service B.
POST /oauth2/token HTTP/1.1
Host: authorization-server.com
Content-Type: application/x-www-form-urlencoded

grant_type=urn:ietf:params:oauth:grant-type:jwt-bearer&requested_token_use=on_behalf_of&client_id=service_a_client_id&client_secret=service_a_client_secret&assertion=user_access_token_for_service_a&scope=service_b_scope
Most of the parameters are known, but anyway here is the description of these
| Parameter | Description |
|---|---|
| grant_type | Indicates that the client is using the JWT Bearer grant type, which is typically used in OBO flows. |
| requested_token_use | Specifies that the token is being requested to act on behalf of the user. |
| client_id | The client ID of Service A. |
| client_secret | The client secret of Service A. |
| assertion | The access token Service A received from the user. This is the usertoken that are delivered from the user itself |
| scope | The scope required for Service B. |
Token Issuance
The authorization server validates the request and issues a new access token that Service A can use to access Service B on behalf of the user.
The response will be delivered directly
{
  "access_token": "access_token_for_service_b",
  "expires_in": 3600,
  "token_type": "Bearer"
}
It's now important to see whats inside this token. The most parts are known but the on-behalf token is quite different.
{
  "aud": "https://service-b.com/api",
  "iss": "https://authorization-server.com",
  "iat": 1696850978,
  "exp": 1696854578,
  "sub": "user@example.com",
  "azp": "service_a_client_id",
  "scope": "service_b_scope",
  "act": {
    "sub": "user@example.com",
    "scope": "user_scope"
  }
}
Important is the part act, this indicates that it's an on-behald token. In this part the identity of the user is stored.
Service A Accesses Service B
Now service A uses the new access token to access protected resources on Service B as usual
GET /resource HTTP/1.1
Host: service-b.com
Authorization: Bearer access_token_for_service_b
The client application can now act as the logged in user.
Device Authorization Grant (Device Code Flow)
This flow will be used when you must grant IoT devices or TVs, so it's designed for devices with limited input capabilities that do not have a keyboard for entering the credentials. This requires then a second device like a smartphone.
The process involves more steps than the other processes.
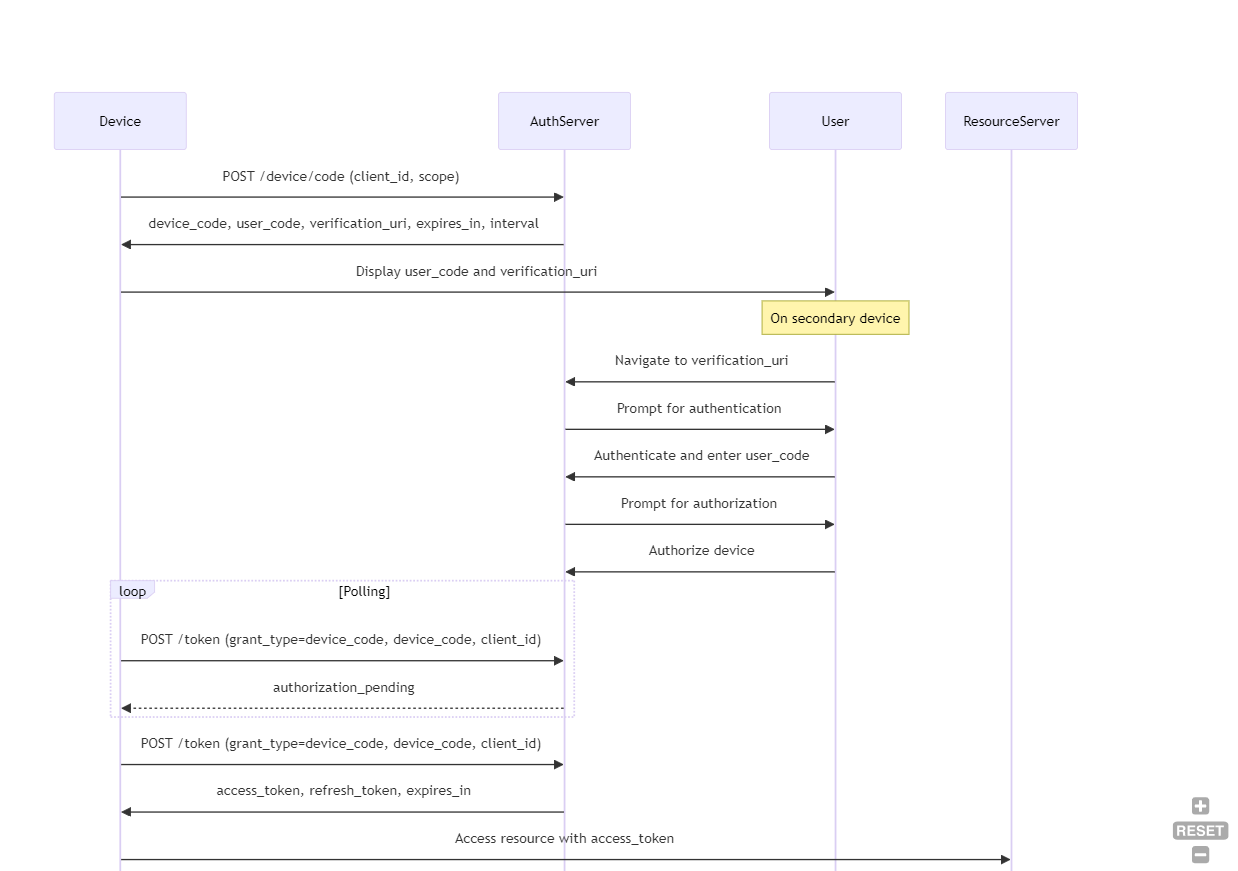
I will describe now the separate steps to execute (in general)
Device Requests Device and User Codes:
The device initiates the flow by requesting a device code and a user code from the authorization server. This is an example request
POST /oauth2/device/code HTTP/1.1
Host: authorization-server.com
Content-Type: application/x-www-form-urlencoded

client_id=your_client_id&scope=openid%20profile%20email
Here you see that the parameters are send within the payload as form urlencoded values.
| Parameter | Description |
|---|---|
| client_id | The client ID issued to the client during registration. |
| scope | The scopes of access requested. |
This request will result following result
{
  "device_code": "GmRhmhcxhwAzkoEqiMEg_DnyEysNkuNhszIySk9eS",
  "user_code": "WDJB-MJHT",
  "verification_uri": "https://authorization-server.com/device",
  "verification_uri_complete": "https://authorization-server.com/device?user_code=WDJB-MJHT",
  "expires_in": 1800,
  "interval": 5
}
Let me describe the claim values
| Claim | Description |
|---|---|
| device_code | The code used by the device to poll for the access token. |
| user_code | The code the user enters on the secondary device. |
| verification_uri | The URL the user visits to authorize the device. |
| verification_uri_complete | A complete URL including the user_code for convenience. |
| expires_in | The lifetime of the device_code and user_code in seconds. |
| interval | The minimum amount of time in seconds the device should wait between polling requests. |
So, this response contains the necessary information to complete the authentication.
User Authenticates on Secondary Device
Now, the device prompts the user to visit a verification URL on a secondary device and enter the user code. You will know this, because it will display a screen like "Hey visit HTTP://myverification_url and enter the code WDJB-MJHT"
Device Polls for Token
While the user navigates to the page and enter the code, the application is polling with the given interval (from the payload response) the result of the authentication. A polling request is a simple post request with the following payload
POST /oauth2/token HTTP/1.1
Host: authorization-server.com
Content-Type: application/x-www-form-urlencoded

grant_type=urn:ietf:params:oauth:grant-type:device_code&device_code=GmRhmhcxhwAzkoEqiMEg_DnyEysNkuNhszIySk9eS&client_id=your_client_id
The parameters are known, but hey, I wanna describe it, too
| Parameter | Description |
|---|---|
| grant_type | Indicates that the client is using the Device Code grant type. |
| device_code | The device code obtained in Step 1. |
| client_id | The client ID issued during registration. |
Now you must work against the response. Here are the possible responses:
- The Authroization ist not done yet
{
  "error": "authorization_pending"
}
- The request was to fast
{
  "error": "slow_down"
}
- Access denied
The user has no access
{
  "error": "access_denied"
}
- Successful response
The user is successfully logged in
{
  "access_token": "access_token_value",
  "token_type": "Bearer",
  "expires_in": 3600,
  "refresh_token": "refresh_token_value",
  "scope": "openid profile email"
}
User Completes Authentication:
While the application is polling for the result, the user authenticates on the secondary device and grants permission to the client application.
Authorization Server Issues Token:
In the success response, you will get the user access token.
Device Accesses Protected Resources:
The device uses the access token to access protected resources from the resource server.
GET /resource HTTP/1.1
Host: resource-server.com
Authorization: Bearer access_token_value
SAML 2.0 Bearer Assertion Grant
In special cases, you only have SAML 2.0 Tokens available and need a JWT-Token. For that, you can exchange the SAML for an access JWT-Token. This grant type is often used in Single Sign-On (SSO) scenarios where a user has already authenticated with an Identity Provider (IdP) that issues SAML assertions.
The process. contains several steps
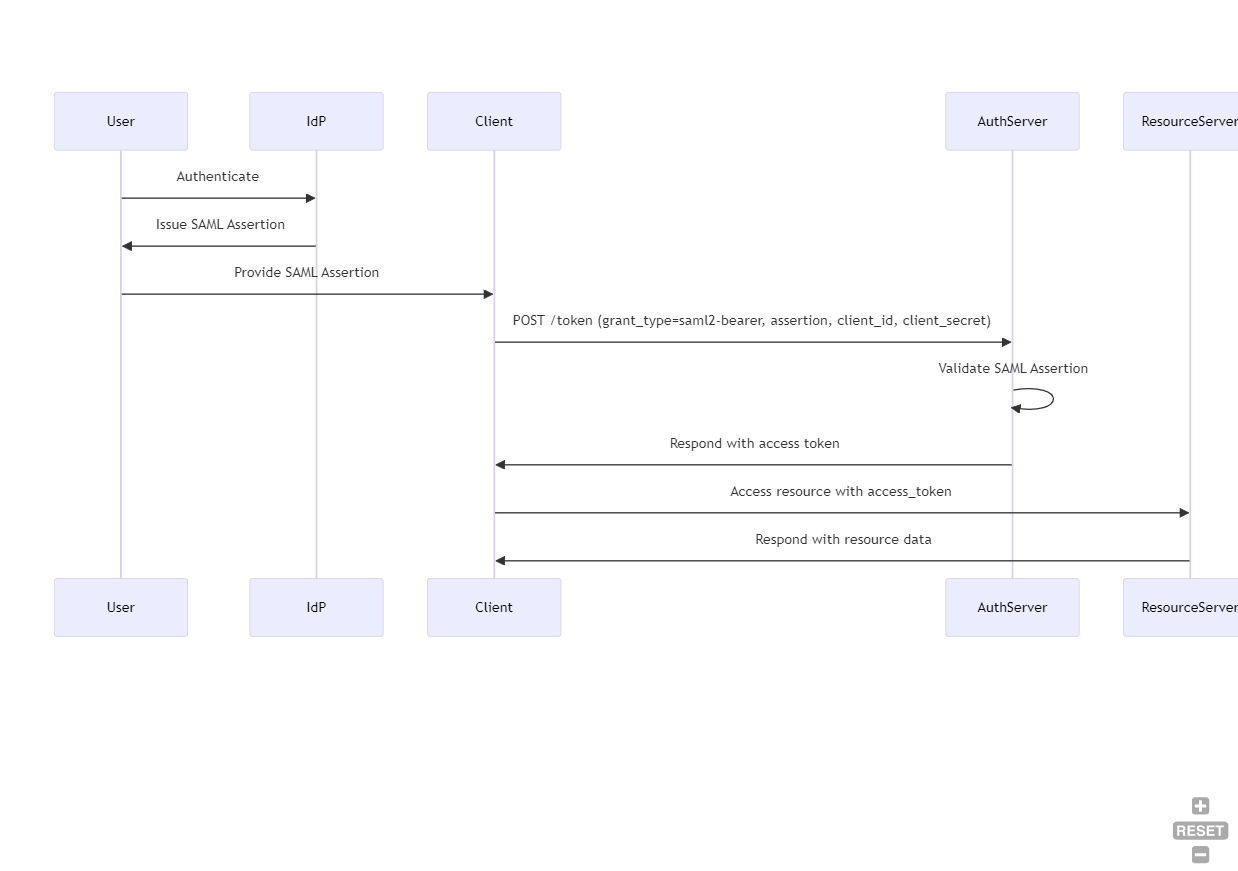
User Authenticates with Identity Provider (IdP)
This step is a little no-brainer. The user logs in to the Application (Sharepoint, SAP, or another Enterprise application). The user then authenticates with an Identity Provider (IdP) and receives a SAML 2.0 assertion. Normally, the XAML Assertion looks like this.
<saml:Assertion xmlns:saml="urn:oasis:names:tc:SAML:2.0:assertion" ID="_abc123" IssueInstant="2024-08-09T12:00:00Z" Version="2.0">
  <saml:Issuer>https://idp.example.com</saml:Issuer>
  <saml:Subject>
    <saml:NameID>user@example.com</saml:NameID>
    <saml:SubjectConfirmation Method="urn:oasis:names:tc:SAML:2.0:cm:bearer">
      <saml:SubjectConfirmationData Recipient="https://authorization-server.com/token" NotOnOrAfter="2024-08-09T12:05:00Z" />
    </saml:SubjectConfirmation>
  </saml:Subject>
  <saml:Conditions NotBefore="2024-08-09T12:00:00Z" NotOnOrAfter="2024-08-09T12:10:00Z">
    <saml:AudienceRestriction>
      <saml:Audience>https://authorization-server.com</saml:Audience>
    </saml:AudienceRestriction>
  </saml:Conditions>
  <saml:AuthnStatement AuthnInstant="2024-08-09T12:00:00Z">
    <saml:AuthnContext>
      <saml:AuthnContextClassRef>urn:oasis:names:tc:SAML:2.0:ac:classes:PasswordProtectedTransport</saml:AuthnContextClassRef>
    </saml:AuthnContext>
  </saml:AuthnStatement>
</saml:Assertion>
Yeah... okay... XAML.. I don't like it. I always get bling when I see XML... You not?
Client Submits SAML Assertion to Authorization Server:
Now the client sends the SAML 2.0 assertion via POST to the OAuth 2.0 authorization server's token endpoint to request an access token.
POST /oauth2/token HTTP/1.1
Host: authorization-server.com
Content-Type: application/x-www-form-urlencoded

grant_type=urn:ietf:params:oauth:grant-type:saml2-bearer&assertion=PHNhbWxwOkFzc2VydGlv...&client_id=your_client_id&client_secret=your_client_secret&scope=openid%20profile%20email
Here is the list of parameters and their description
| Parameter | Description |
|---|---|
| grant_type | Indicates that the client is using the SAML 2.0 Bearer Assertion grant type. |
| assertion | The Base64-encoded SAML 2.0 assertion. |
| client_id | The client ID issued during registration. |
| client_secret | The client secret issued during registration. |
| scope | The scopes of access requested. |
Please note that you need the xaml assertion as base64 encoded value.
Authorization Server Validates Assertion:
The authorization server validates the SAML assertion, checking its authenticity and validity, such as whether the signature is valid or the token is still active.
Authorization Server Issues Access Token:
If the assertion is valid, the authorization server issues an access token to the client. The result is already known (I will now skip the explanation of the claims because it's done above several times)
{
  "access_token": "access_token_value",
  "token_type": "Bearer",
  "expires_in": 3600,
  "refresh_token": "refresh_token_value",
  "scope": "openid profile email"
}
Client Accesses Protected Resources:
Finally, the client uses the access token to access protected resources on behalf of the user. You can access the resources now again with the bearer authorization. For example:
GET /resource HTTP/1.1
Host: resource-server.com
Authorization: Bearer access_token_value
Token Exchange Grant (RFC 8693)
The Token Exchange Grant, defined in RFC 8693, allows a client to exchange one type of security token (like an access token, ID token, or SAML assertion) for another token.
This is useful when an application needs a token with different scopes or audiences or when a token needs to be delegated to another service.
The process is very small
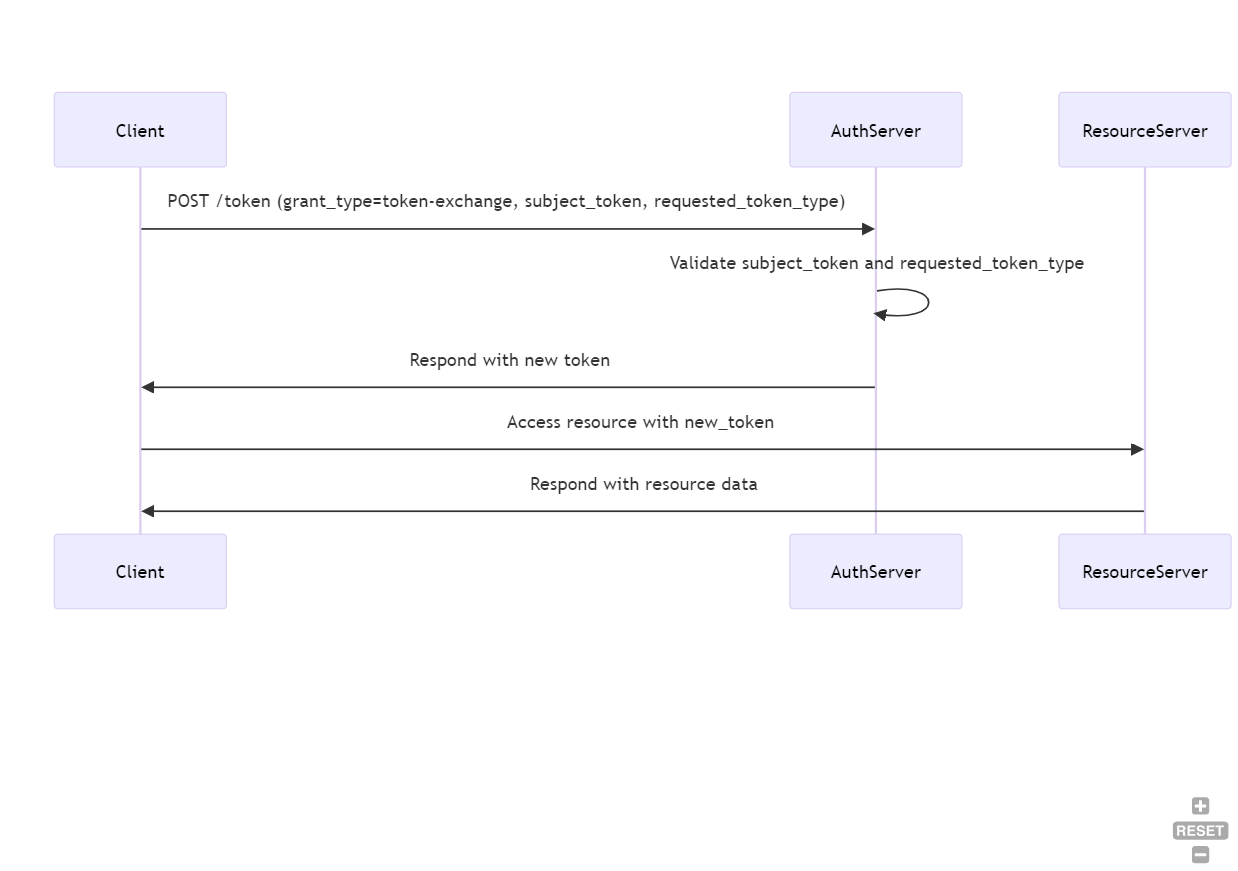
This contains the following steps
Client Submits Token Exchange Request
It all starts with a first Post request 😄. So here is the request to initiate the exchange request
POST /oauth2/token HTTP/1.1
Host: authorization-server.com
Content-Type: application/x-www-form-urlencoded

grant_type=urn:ietf:params:oauth:grant-type:token-exchange
&subject_token=eyJhbGciOiJSUzI1NiIsInR5cCI6IkpXVCJ9...
&subject_token_type=urn:ietf:params:oauth:token-type:access_token
&requested_token_type=urn:ietf:params:oauth:token-type:refresh_token
&audience=https://service-b.com/api
&scope=openid profile email
&client_id=your_client_id
&client_secret=your_client_secret
The Parameters will be submitted within the payload as form-urlencoded values
| Parameter | Description |
|---|---|
| grant_type | Indicates that the client is using the Token Exchange grant type. |
| subject_token | The token being exchanged (e.g., an access token or ID token). |
| subject_token_type | The type of the token being exchanged (e.g., access_token, id_token, or urn:ietf:params:oauth:token-type:saml2). |
| requested_token_type | The type of token the client wants to receive (e.g., access_token, refresh_token, or another valid type). |
| audience | (Optional) The intended audience of the requested token. |
| scope | (Optional) The scopes of access requested for the new token. |
| client_id | The client ID issued during registration. |
| client_secret | The client secret issued during registration. |
So, the client requests that the authorization server exchange one token (the "subject token") for another token (the "requested token type").
Authorization Server Validates Request:
Next, the authorization server validates the incoming token, the requested token type, and the client’s permissions—this is a regular validation of the token itself.
Authorization Server Issues New Token:
It is all valid, the server will create the requested token and will respond to it immediately
{
  "access_token": "new_access_token_value",
  "token_type": "Bearer",
  "expires_in": 3600,
  "scope": "openid profile email"
}
Client Uses New Token:
Now you can use this token for accessing protected resources.
GET /resource HTTP/1.1
Host: resource-server.com
Authorization: Bearer new_access_token_value
Refreshing the actual token
The access token has a limited lifetime, which means that this token can expire. Yes, you can force the user to log in again, but no user wants to log in several times daily. For that, a refresh token is available. This token has a longer lifetime and can "refresh" the access token. So, a refresh is, in simple words, to generate a new one.
This is not a process, so hey, it's a simple POST call to the authorization server.
POST /oauth2/token HTTP/1.1
Host: authorization-server.com
Content-Type: application/x-www-form-urlencoded

grant_type=refresh_token
&refresh_token=your_refresh_token_value
&client_id=your_client_id
&client_secret=your_client_secret
&scope=openid profile email
Let's explain the parameters
| Parameter | Description |
|---|---|
| grant_type | Indicates that the client is using the Refresh Token grant type. |
| refresh_token | The refresh token issued during a previous authorization. |
| client_id | The client ID issued during registration. |
| client_secret | The client secret issued during registration. |
| scope | (Optional) Scopes for the new access token, if different from the original request. |
The important party is that you send the refresh_token to the server and set the correct grant_type value.
The server will respond immediately the new token in the known format
{
  "access_token": "new_access_token_value",
  "token_type": "Bearer",
  "expires_in": 3600,
  "refresh_token": "new_refresh_token_value",
  "scope": "openid profile email"
}
Please consider!
Here are two things to consider, when refreshing a token
Refresh Token Expiry
Again! Refresh tokens often have a longer lifespan than access tokens but can still expire or be revoked. If a refresh token is expired or invalid, the client will need to obtain a new access token by having the user re-authenticate.
Scope:
If the scope the parameter is omitted, the new access token will have the same scopes as the original one. If included, the new access token may have a subset of the scopes grantedby the refresh token.
Final Words
I hope that this article can help you understand a little bit about OAuth itself, its flows, and whats the meaning of the claim.
Please leave feedback for this Blog so that I can improve it.