Implementing a captive portal for your ESP device
Let's consider you are in a cafè and you want to go to the internet. You recognize that you can use the free wifi, so you select the wifi and a nice looking page comes up and prompt you for some information like email phone number and so on. This Portal is called a captive portal.
In one of my famous side project the Hivescale for my bees I use this captive portal to configure some specific for a tare or the first configuration like ... yes wifi connection and so on. This app is running on a small esp device and this will get some telemetry for my hives. So let me introduce you to how you can create a simple captive portal for your requirements.
Required libraries
Now that the meaning and application of a Captive Portal are clear, now let's do the practical way. I will guide you through a piece of code that you can adapt to your needs. First of all, we need a webserver that will host our website to represent the portal itself. I use for this the ESPAsyncWebserver library.
Please note the complete code can be found here: Captive Portal (github.com)
First we must include the libraries that we need to run
Next, we need some variables:
The AsyncWebServer is defined on port 80, which is the HTTP port.
Next, we literally define the HTML file as a raw string literal in the Program Memory called PROGMEM). It contains a form essentially, which asks the user for a name and ESP32 Proficiency:
Next, we create a CaptiveRequestHandler class which is inherited from the AsyncWebHandler class. Within the class, we have the two functions: canHandle() and handleRequest().
The canHandle() method simply returns true here, meaning that our captive portal can handle any request.
Next, the handleRequest function tells the AsyncWebServer what to do when a request is received. This is the function that is responsible for the captive portal opening up every time you connect to the WiFi of ESP32. We simply return the index_html page that we defined above (in our PROGMEM). Please note that send_P is used instead of send because we are fetching a large web page from the Program memory (PROGMEM).
The next function is very important. We set up theAsyncWebServer to respond to various requests, process the data received in the request and send a reply:
What we doing is to tell the server that when there is a GET request for the ‘/’ path, then redirect the user to index_html, and it receives a GET request for the ‘/get’ path (this will be at the time of form submission), then look for the name and proficiency in the response, and extract and store those fields is available, and send an acknowledgment to the user.
Note that “name” and “proficiency” are the names given to the input fields in index_html.
Also, note that the above function tells the server how to handle requests irrespective of the Captive Portal. In other words, if you connect to the ESP32’s WiFi field and enter the IP address in the browser, you’ll still be served by the index_html page, and if you fill out the form, your request will still be processed.
Next, in the setup() function, we initialize Serial, set the WiFi mode to Access Point (this helps create the WiFi field around ESP32), and name the WiFi field “my-captive”.
Then we set up the AsyncWebServer using the setupServer command. The next part is important. We set up and start the DNS server with the following line:
dnsServer.start(53, “*”, WiFi.softAPIP());
What does this mean? For that, we first have to understand the meaning of a DNS server. DNS stands for ‘Domain Name System’. When you type www.google.com in your web browser, the request gets sent to a DNS Server first, which translates this domain name into an IP Address, and then redirects the user to the corresponding IP address. On ESP32 we are creating our own DNS Server, and redirecting any domain name (*) to the IP of ESP32 (WiFi.softAPIP()). 53 stands for the port number. Just like HTTP requests are executed over port 80, HTTPS over port 443, DNS requests are executed over port 53.
So, what happens exactly? How does the system work? Every time your device connects to a new network, it tried to access a specific URL.
Which URL? That depends on your device. If it gets a response, it concludes that the internet is connected, else you see a message like “This WiFi has no access to the internet”.Now, when the device tries to connect with the ESP32’s WiFi, it again tries to send a request to a specific URL. The ESP32’s DNS server redirects it to the Soft AP IP address of ESP32, because remember, we are redirecting all domain names to this IP. On this IP, the captive request handler takes care of displaying the webpage, and the Async Web Server (set up using setupServer()), handles all the incoming request.
Of course, the next line is important, and last piece of the jigsaw puzzle. It links the Async Web Server with the Captive Request Handler, only when the request is in the Access Point mode.
server.addHandler(new CaptiveRequestHandler()).setFilter(ON_AP_FILTER);//only when requested from AP With the system ready, we begin the server.
Within the loop, we just keep processing the requests made to the dnsServer and, if name and proficiency are received, we print them.
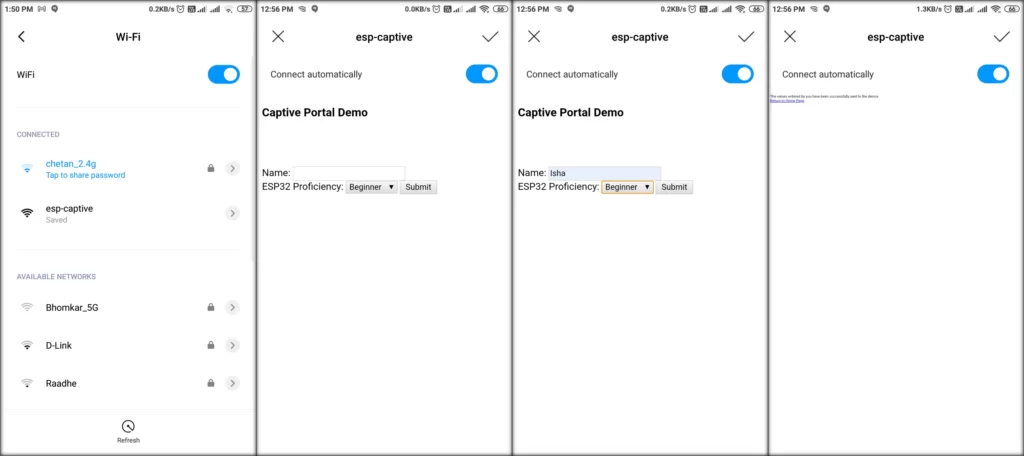
Results:
Once you upload this code on the ESP32, the screenshots below will illustrate how the Captive Portal Works, and also the series of prints on the Serial Monitor.
Connecting to ESP32’s Wi-Fi field using a mobile phone
I hope you had fun creating the captive portal using ESP32!