Fetching Data from SAP SuccessFactors via OData and OAuth
In a few posts in the past, I described the integration of the SAP Data in Copilot. So, the big question was, how can it get the data from the SuccessFactors instance? In fact, it may be simple. Creating a technical user and accessing the data. That's it. But I do not want the easy thing; I want safe access because we work with susceptible data here. So, I must find a way to access it on behalf of a user. Yes, I pointed out a way to create an on-reside request about OAuth in my post about OAuth. But here, SAP will do a slightly different way to do this. So I tell you in this post the way to do this.
How to get the Data out of the System
The answer is quite simple: use OData. I'm on the MS Path; there, it is very simple: I create an AppRegistration thingy, grant access, and then I can call the system.
Requirements
Before we start, the following information must be fetched.
- The CompanyID
- A registered OAuth Client (in SF)
- The private key that will be generated in SF
You will get this within the SuccesFactors instance. Please make sure that you are logged in as an administrator to get these informations.
The Process
So, In SAP SuccessFactors is a little bit more complex. Let show me the gross process of the authentication and fetching the data.
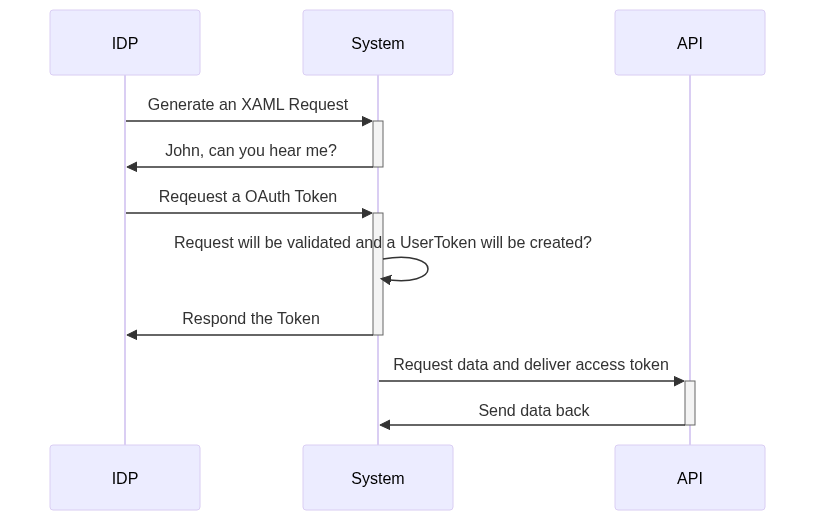
Source: here
Don't get confused about that... Let's do it step by step.
Step 1: Creating a XAML request
First, we must create an XAML Request to tell the IDP later which user we will use for the system. This will be done by making a POST call to this endpoint.
POST /oauth/idp HTTP/1.1
Host: {{identity-base-url}}
Content-Type: application/x-www-form-urlencoded
Content-Length: 2320

client_id=MzAyZGZjOTg5Y2M0YWQ2YmU3YmFjZTY4YmFjMw&user_id=sfadmin&token_url=%7B%7Bidentity-base-url%7D%7D%2Fouth%2Ftoken&private_key=
You will see some parameters in the body.
| Parameter | Description |
|---|---|
| client_id | Here you will insert the client ID that you gathered in the requirements |
| user_id | This will contains the user id like sfadmin. These must be known in the system |
| token_url | Here you will se the token url like {{identity-base-url}}/oauth/token |
| private_key | This will contains the private key that ouy gathered before |
You can create the XAML Request at your own, that's also the best way to do. But it's more complex and I would recommend to use a tool for that. For this demo purpose, I will use the idp endpoint.
You will then get back an XAML Request token encoded in base 64. Mine looks like this (I removed the essential parts)
<?xml version="1.0" encoding="UTF-8"?>
<saml2:Assertion xmlns:saml2="urn:oasis:names:tc:SAML:2.0:assertion"
    ID="33ec9645-69a8-4bc6-8524-57eaac0cbefc" IssueInstant="2024-09-01T05:54:36.517Z" Version="2.0"
    xmlns:xs="http://www.w3.org/2001/XMLSchema"
    xmlns:xsi="http://www.w3.org/2001/XMLSchema-instance">
    <saml2:Issuer>www.successfactors.com/oauth/idp</saml2:Issuer>
    <ds:Signature xmlns:ds="http://www.w3.org/2000/09/xmldsig#">
        <ds:SignedInfo xmlns:ds="http://www.w3.org/2000/09/xmldsig#">
            <ds:CanonicalizationMethod Algorithm="http://www.w3.org/2001/10/xml-exc-c14n#"
                xmlns:ds="http://www.w3.org/2000/09/xmldsig#" />
            <ds:SignatureMethod Algorithm="http://www.w3.org/2001/04/xmldsig-more#rsa-sha256"
                xmlns:ds="http://www.w3.org/2000/09/xmldsig#" />
            <ds:Reference URI="#33ec9645-69a8-4bc6-8524-57eaac0cbefc"
                xmlns:ds="http://www.w3.org/2000/09/xmldsig#">
                <ds:Transforms xmlns:ds="http://www.w3.org/2000/09/xmldsig#">
                    <ds:Transform Algorithm="http://www.w3.org/2000/09/xmldsig#enveloped-signature"
                        xmlns:ds="http://www.w3.org/2000/09/xmldsig#" />
                    <ds:Transform Algorithm="http://www.w3.org/2001/10/xml-exc-c14n#"
                        xmlns:ds="http://www.w3.org/2000/09/xmldsig#">
                        <ec:InclusiveNamespaces xmlns:ec="http://www.w3.org/2001/10/xml-exc-c14n#"
                            PrefixList="xs" />
                    </ds:Transform>
                </ds:Transforms>
                <ds:DigestMethod Algorithm="http://www.w3.org/2000/09/xmldsig#sha1"
                    xmlns:ds="http://www.w3.org/2000/09/xmldsig#" />
                <ds:DigestValue xmlns:ds="http://www.w3.org/2000/09/xmldsig#">
                    xxxx</ds:DigestValue>
            </ds:Reference>
        </ds:SignedInfo>
        <ds:SignatureValue xmlns:ds="http://www.w3.org/2000/09/xmldsig#">
            xxxxx
        </ds:SignatureValue>
        <ds:KeyInfo>
            <ds:X509Data>
                <ds:X509Certificate>xxxxx</ds:X509Certificate>
            </ds:X509Data>
        </ds:KeyInfo>
    </ds:Signature>
    <saml2:Subject>
        <saml2:NameID Format="urn:oasis:names:tc:SAML:1.1:nameid-format:unspecified">sfadmin</saml2:NameID>
        <saml2:SubjectConfirmation Method="urn:oasis:names:tc:SAML:2.0:cm:bearer">
            <saml2:SubjectConfirmationData NotOnOrAfter="2024-09-01T06:04:36.517Z"
                Recipient="https://apisalesdemo2.successfactors.eu/outh/token" />
        </saml2:SubjectConfirmation>
    </saml2:Subject>
    <saml2:Conditions NotBefore="2024-09-01T05:44:36.517Z" NotOnOrAfter="2024-09-01T06:04:36.517Z">
        <saml2:AudienceRestriction>
            <saml2:Audience>www.successfactors.com</saml2:Audience>
        </saml2:AudienceRestriction>
    </saml2:Conditions>
    <saml2:AuthnStatement AuthnInstant="2024-09-01T05:54:36.517Z"
        SessionIndex="4e56e038-14bb-43b2-ae10-278e79d0923a">
        <saml2:AuthnContext>
            <saml2:AuthnContextClassRef>
                urn:oasis:names:tc:SAML:2.0:ac:classes:PasswordProtectedTransport</saml2:AuthnContextClassRef>
        </saml2:AuthnContext>
    </saml2:AuthnStatement>
    <saml2:AttributeStatement>
        <saml2:Attribute Name="api_key">
            <saml2:AttributeValue xsi:type="xs:string">XXXXX</saml2:AttributeValue>
        </saml2:Attribute>
    </saml2:AttributeStatement>
</saml2:Assertion>
The imported part is this
<saml2:NameID Format="urn:oasis:names:tc:SAML:1.1:nameid-format:unspecified">sfadmin</saml2:NameID>
This tells the IDP later which user to impersonate. So, we create an impersonate request.
Step 2: Generate a token
Now we got a XAML request Token. It is only a request token, to it don't provide any access to anything. This token will tell the IDP "Hey here is a prevalidated request, so generate me an access token for this requested user".
So, to do this, you must make a call to the IDP to create an access token
POST /oauth/token HTTP/1.1
Host: {{identity-base-url}}
Content-Type: application/x-www-form-urlencoded
Content-Length: 69

company_id=YOURCOMPANYID&client_id=&grant_type=urn:ietf:params:oauth:grant-type:saml2-bearer&assertion=&new_token=true
So, it will perform an assertion request and take the following parameters.
| Parameter | Description |
|---|---|
| company_id | This will contain the companyid that was gathered before |
| client_id | Here, you will insert the same client id that you have in the requirements section |
| grant_type | In this, you MUST set the value 'urn:ietf:params:oauth:grant-type:saml2-bearer' |
| assertion | Here, you will paste the result in the previous request |
| new_token | Optional, you can set it to true, to get every request a new token otherwise, you will get the actual valid token |
After performing this request, you will get a token response like this
{
    "access_token": "eyJ0b.......",
    "token_type": "Bearer",
    "expires_in": 86399
}
Cool! A token... let's look into this
{
    "tokenContent": {
        "apiKey": "....",
        "sfPrinciple": "sfadmin#DIV#.....",
        "issuedFor": "OData-Test",
        "scope": "",
        "issuedAt": 1725175828353,
        "expiresAt": 1725262228353
    },
    "signature": "E3hwoX5Bn++...."
}
It's not a typical OAuth token, but that doesn't matter. Because the necessary information is included. So, you see that I requested the token for sfadmin.
Step 3: Using this Token
Now, it's time to use this token. So, in my large blog post about OAuth, you learned to set this token into the Authorization header. In fact, it will look like this.
GET /odata/v2/EmployeeTime?$top=10000&$filter=timeType eq 'DEU-ANNL'
HTTP/1.1
Host: apisalesdemo2.successfactors.eu
Authorization: Bearer {{bearer}}
Accept: application/json
S
This will perform a request against the OData endpoint and gather the information about the German absences. I set the Accept header so that I only get JSON Response, and it will result in this:
{
    "d": {
        "results": [
            {
                "__metadata": {
                    "uri": "https://apisalesdemo2.successfactors.eu/odata/v2/EmployeeTime('e8bf3db2866d4d48901833ddd3218e87')",
                    "type": "SFOData.EmployeeTime"
                },
                "externalCode": "e8bf3db2866d4d48901833ddd3218e87",
                "lastModifiedDateTime": "/Date(1519356175000+0000)/",
                "absenceDurationCategory": "MULTI_DAY",
                "endDate": "/Date(1534464000000)/",
                "entityUUID": "2C46792DA8A64AC9A63FEB266EEF7034",
                "loaActualReturnDate": null,
                "mdfSystemEffectiveEndDate": "/Date(253402214400000)/",
                "createdDateTime": "/Date(1519355904000+0000)/",
                "mdfSystemVersionId": null,
                "timeType": "DEU-ANNL",
                .......
Now, you will get the required data. The cool part is that you access it as a user you provide; you won't get access to other data that this particular user cannot access.
Final words
Yes, SAP is very special, especially when you want to access its services. I think that is related to their license topic. But hey, when you know how to do it, it will be straightforward to access the data.
I created a Postman collection for those who want to try it out of the box.